Tie stable fishing knots fast with simple steps anyone can follow.
I’ve tied knots on cold mornings, windy evenings, and calm rivers. I’ll show you clear, proven steps for how to tie a fishing knot step by step. This guide blends field-tested tips, plain instructions, and common traps I’ve learned from years on the water. Read on to master knots that hold, cast well, and keep fish on the line.

Why proper knots matter
A strong knot keeps fish on the line and gear working as it should. Learning how to tie a fishing knot step by step saves time and prevents lost fish and broken rigs. Good knots also keep your line from slipping through rod guides and reduce wear on leaders. Treat knots as part of your safety and success toolkit on the water.

Basic tools and terms
Knowing simple tools and words helps when you learn how to tie a fishing knot step by step. Keep these items in your pack:
- Scissors or clippers for clean cuts.
- Pliers or hemostats for tight pulls.
- A small towel or knot-tying mat for wet hands.
Key terms to know: - Standing line: the main line.
- Tag end: the short free end after tying.
- Loop: a bend in the line used in many knots.

General step-by-step method for tying any fishing knot
Follow these basic steps to learn how to tie a fishing knot step by step. These steps work for most knots and help you test strength.
- Wet the line before you tighten. A drop of water or saliva reduces friction and keeps the line from weakening.
- Make the base shape. Form the needed loop or wrap around the hook or swivel.
- Wrap the tag end as required by the knot. Count the wraps and keep them neat and even.
- Pull the standing line slowly while holding the tag end. Keep tension and let the knot dress itself.
- Trim the tag end close but not too close. Leave a small stub to protect the knot from slipping.
From my experience, step 1 and step 4 are the most critical. Skipping wetting or yanking the knot tight can cut the line. Practice the general flow until it feels natural, then move on to knot-specific steps.
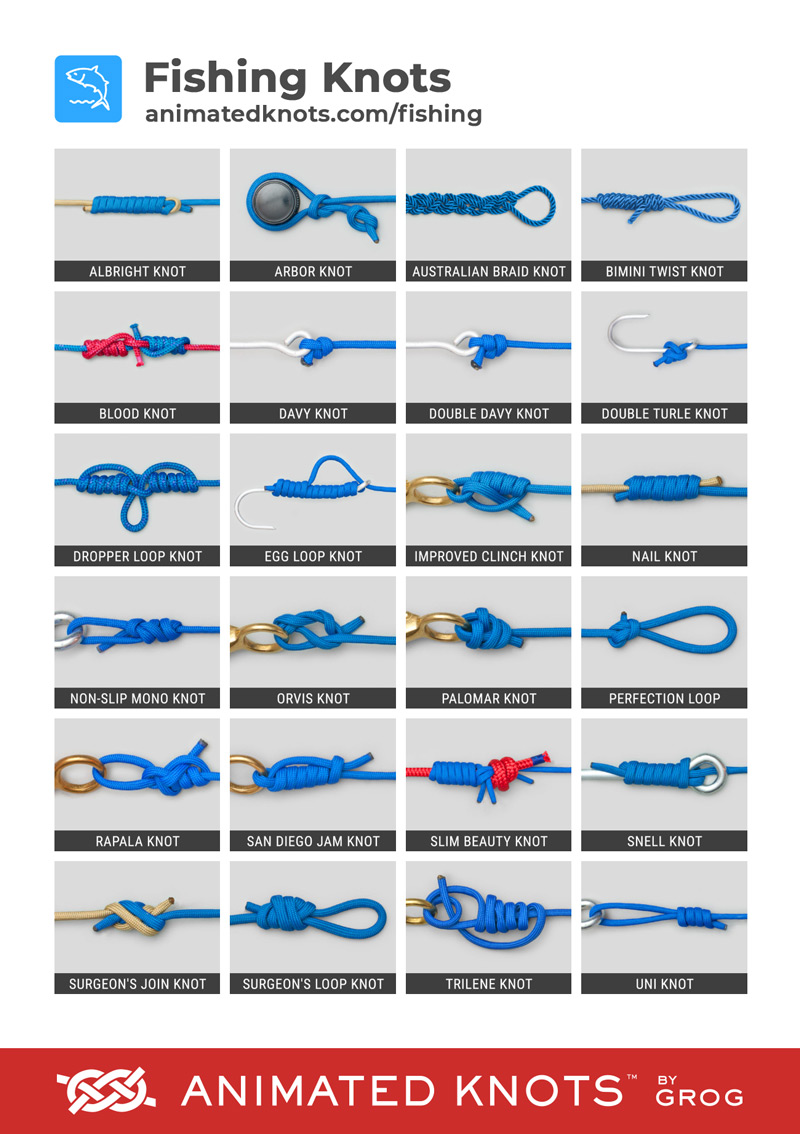
Common knots with step-by-step instructions
Here are clear, short guides for the most useful knots when you learn how to tie a fishing knot step by step. I use these every trip.
Improved Clinch Knot
- Thread the line through the hook eye and double back. Hold about 6 inches of tag end.
- Wrap the tag end around the standing line 5 to 7 times.
- Thread the tag end through the small loop near the eye, then back through the big loop you just made.
- Wet, then tighten by pulling the standing line while holding the tag end. Trim the tag end.
Palomar Knot
- Double 6 inches of line and pass the loop through the hook eye.
- Tie a loose overhand knot with the doubled line so the hook hangs below.
- Pass the loop over the hook.
- Wet and pull both the standing line and tag ends to tighten. Trim the tag end.
Uni Knot (Versatile for leaders and hooks)
- Pass the line through the eye and double back to make a loop alongside the standing line.
- Make 4 to 6 wraps with the tag end around both lines.
- Pull the tag to tighten the wraps and slide the knot down to the eye or leave a small loop.
- Trim the tag end.
Blood Knot (connecting two lines)
- Overlap the ends of the two lines by 6 inches.
- Wrap one tag end around the other line 5 times, then pass it back through the center gap.
- Repeat with the other tag end in the opposite direction.
- Wet and pull both standing ends to slide the two coils together. Trim tags.
Each knot above works well in different situations. Practice them often to build speed and confidence when you tie a fishing knot step by step.

Tips, mistakes to avoid, and advanced notes
Small habits make a big difference when you learn how to tie a fishing knot step by step. Here are practical tips I use on every trip:
- Always wet the knot before final tightening. This protects line strength.
- Keep wraps neat and together. Messy wraps fail more often.
- Use more wraps with slippery braid; fewer wraps with mono or fluorocarbon.
Common mistakes to avoid: - Cutting the tag too close right away. Leave a small tag and retest the knot.
- Rushing the pull. Tighten slowly to let the knot seat properly.
Advanced notes: - Test knots under load before you cast. A firm tug is a good check.
- For braid to leader, try a double uni or a specialized connector knot for extra security.
PAA-style question 1: How long does it take to learn basic knots?
- With focused practice, you can learn 2–3 knots in one session and be comfortable in a week. Short daily practice speeds improvement.
PAA-style question 2: Which knot is best for beginners?
- The improved clinch and Palomar are best for beginners. They are quick, strong, and cover most common rigs.

Frequently Asked Questions of how to tie a fishing knot step by step
What is the easiest fishing knot to learn quickly?
The improved clinch knot and Palomar knot are the easiest to pick up. Both use simple wraps and hold well for most hooks and lures.
How many wraps should I make for an improved clinch knot?
Make 5 to 7 wraps for monofilament and 7 to 9 for thicker or slippery lines. More wraps increase friction and security.
Should I wet the knot before I tighten it?
Yes. Wetting the knot reduces heat from friction and preserves line strength. Use water or saliva to lubricate.
Can I use the same knot for braid and mono?
Not always. Braid is slippery, so you often need more wraps or a Palomar/uni knot variation. Test the knot before fishing.
How do I know if my knot is strong enough?
Give a firm tug on the line and check for slippage or damage. If the knot holds under a hard pull, it is usually strong enough.
When should I change my knot or re-tie?
Re-tie if the knot shows wear, if the tag end frays, or after a heavy fight. Regular re-tying prevents unexpected failures.
Is trimming the tag end important?
Yes, trimming reduces snag risk and keeps the knot neat. Leave a small 1/8 inch tag to prevent slippage.
Conclusion
Mastering how to tie a fishing knot step by step makes every trip better. Use the general method, learn a few reliable knots, and test them each time you head out. Start with the improved clinch and Palomar, practice until your fingers remember the motions, and you’ll save fish and time. Try these steps on your next outing, share your results, and subscribe or comment to ask about a knot you want to master.